The Definitive Guide to API Test Automation With Playwright: Part 8 - Adding ESlint, Prettier, and Husky

I'm a big fan of consistency within a codebase. I somewhat care less about the specifics as long as it's the same. Today I'll cover extra tooling that are common in the JS/TS ecosystem to help solve common errors and consistency. If you're just joining us now go check out the introduction post which links to all parts we've covered so far.
The tools that are covered
- ESLint - ESLint statically analyzes your code to quickly find problems. It is built into most text editors and you can run ESLint as part of your continuous integration pipeline.
- Prettier - An opinionated code formatter - By far the biggest reason for adopting Prettier is to stop all the ongoing debates over styles.
- Husky - Modern native git hooks made easy
Each of these tools bring something different to the table. In this guide I'll be covering how I currently configure these tool in my repos.
ESLint
For ESLint I will be using a typescript-eslint, following this guide. This is the command npm install --save-dev @typescript-eslint/parser @typescript-eslint/eslint-plugin eslint typescript. This will install all the depencies that we need.
Next create a file .eslintrc.cjs at the root of the directory, this will be our config file.
// .eslintrc.cjs

/* eslint-env node */
module.exports = {
    extends: ['eslint:recommended',
    'plugin:@typescript-eslint/recommended',
    'plugin:@typescript-eslint/stylistic',
  ],
    parser: '@typescript-eslint/parser',
    plugins: ['@typescript-eslint'],
    root: true,
    parserOptions: {
      project: true,
      tsconfigRootDir: __dirname,
    },
  };
Running npx eslint . will run ESLint and you will more than likely have a lot of errors. This is because all files in the directory are being linted, there are many files that we don't care about such as the files in the node_modules folder or our playwright test folders, let's make sure those aren't in the scope of our lint command by creating an ignore file. Creating a file named .eslintignore at the root directory and add the following text.
// .eslintignore

# Playwright Specific
node_modules/
test-results/
playwright-report
summary.json

# IDE - VSCode
.vscode/*

# System Files
.DS_Store
Thumbs.db
{"mode":"full","isActive":false}

# Docs files
*_spec3.json
Now if you run npx eslint . you will notice a much smaller number, and if your code is the exact same as mine, you will have the below output.
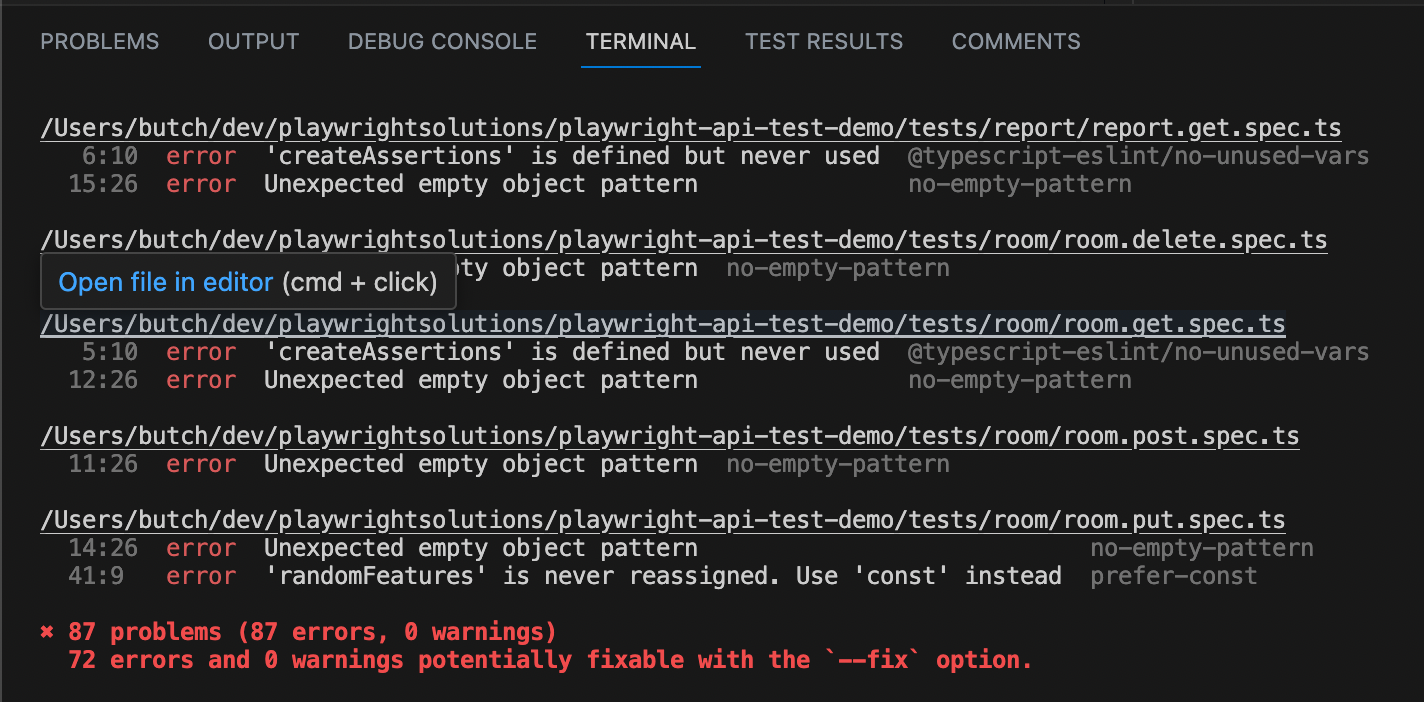
I would highly encourage you to take time and read each new error you come across, and understand the "why" to why the linter isn't happy. I've learned a lot about good coding practices from linting my own code over the years in Ruby (RuboCop I still remember our love hate relationship).
Once you have a decent understanding of the changes, you can also utilize ESLint to "fix" our issues if it knows how by passing in the --fix option into the command like so npx eslint . --fix. After doing this I went ahead and ran all the tests to ensure that all the code is still functional, and all tests passed. Now when I run my npx eslint . command I have 15 failures that I need to resolve on my own.
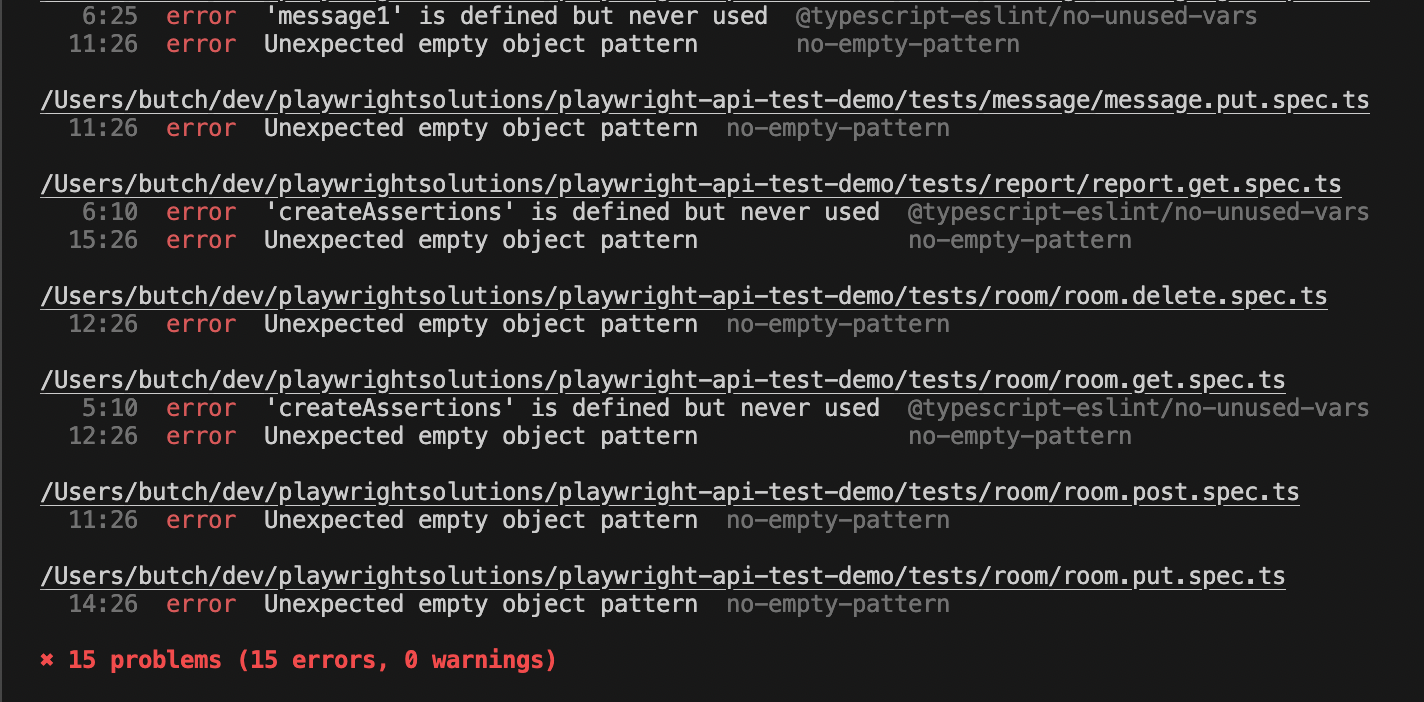
I took 5 minutes and was able to update all but 1 of the issues in my files. The specific error was 'createAssertions' is defined but never used. This is an import statement, where I have createHeaders() commented out in my code below. I want to keep the import there, and have ESLint ignore that line of code. To accomplish this I add a comment to the line that I want ignored // eslint-disable-line.
// tests/room/room.get.spec.ts

//COVERAGE_TAG: GET /room/
//COVERAGE_TAG: GET /room/{id}

import { createRoom, defaultRoom } from "@datafactory/room";
import { createAssertions } from "@helpers/createAssertions"; // eslint-disable-line
import { test, expect } from "@playwright/test";

test.describe("room/ GET requests", async () => {
  let room;
  let roomId;
.....
Now when re-running the linter I have everything passing! Go ahead and take a few minutes and read through all the other ways you can disable ESLint at the below site. The below is a great resource worth bookmarking.
 Coderslang Master
Now onto prettier, what we will be using for our formatting/styling needs.
Prettier
For Prettier we will continue to use the typescript-eslint guide linked below.
Before we install we need to install this package eslint-config-prettier. This will disable settings that may conflict with the prettier plugin.
npm install --save-dev eslint-config-prettier
Once installed we will need to update our ESLint config file by adding prettier to the extends array.
// eslintrc.cjs

/* eslint-env node */
module.exports = {
    extends: ['eslint:recommended',
    'plugin:@typescript-eslint/recommended',
    'plugin:@typescript-eslint/stylistic',
    'prettier'
  ],
    parser: '@typescript-eslint/parser',
    plugins: ['@typescript-eslint'],
    root: true,
  };
Now we should install Prettier itself as a node package. The guide I'm using to install Prettier can be found here on their site. The command to install is npm install --save-dev --save-exact prettier.
Now you will still need to create a .prettierrc file in your projects root directory. This file will include the configurations you want prettier to use, mine is below. The different options that can be added/edited can be found in the docs here.
// .prettierrc
{
    "semi": true,
    "trailingComma": "es5",
    "singleQuote": false,
    "printWidth": 120
}
You should also go ahead and create a .prettierignore file that should look the same as your .eslintignore.
// .prettierignore
# Playwright Specific
node_modules/
test-results/
playwright-report
summary.json

# IDE - VSCode
.vscode/*

# System Files
.DS_Store
Thumbs.db
{"mode":"full","isActive":false}

# Docs files
*_spec3.json
Now that we have that in place let's run the prettier command and see the results. npx prettier . --check. When I ran this command this was my output.
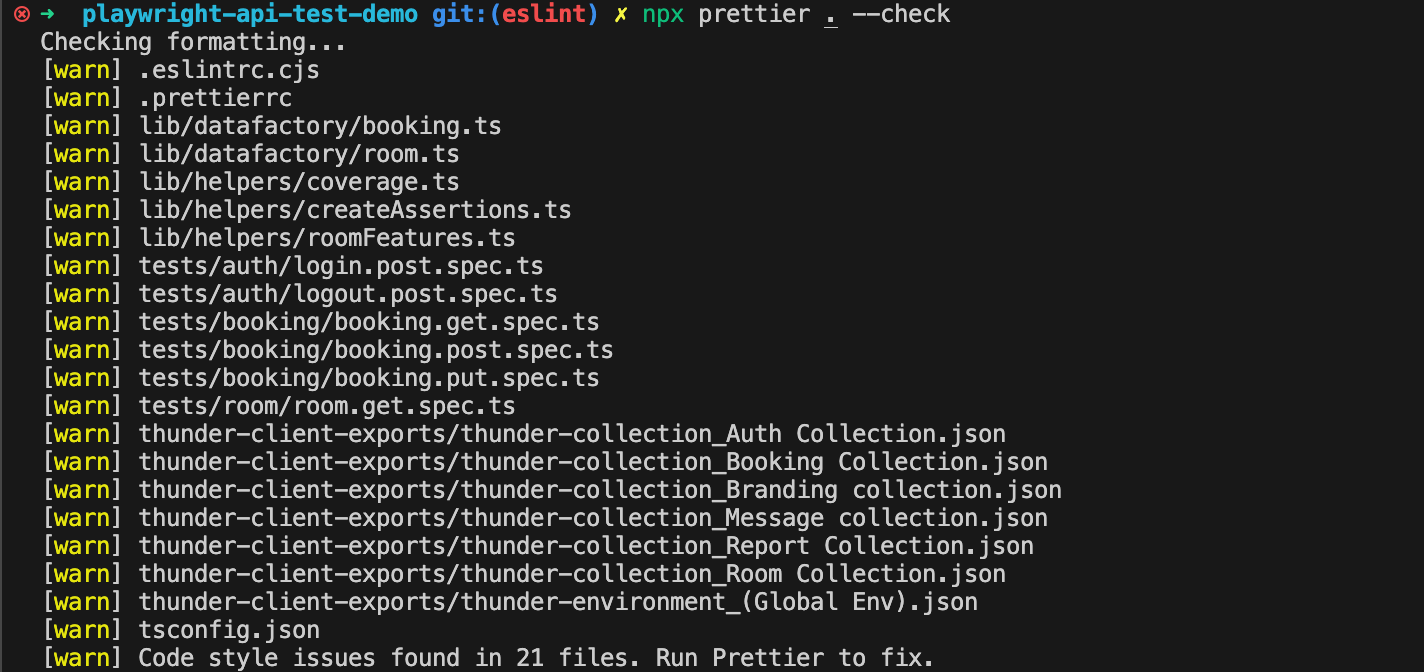
To go ahead and apply the changes prettier wants to make, you can run the command npx prettier . --write. A full list of CLI commands can be found in their docs. Once the files are updated, I will go ahead and commit and push them to my working branch. At this point, we have a working ESLint command and working prettier command. Now how can we force ourselves, teams, and collaborators to use this tools without thinking about it?
Husky
We will utilize a package called Husky to help us create and manage our local git pre-commit hooks. This will allow us to insert commands to run our tooling before we commit code to our local branch every single time. I'll be following this guide. The first command that needs to be run npx husky-init && npm install. This command will:
- Add
preparescript topackage.json - Create a sample
pre-commithook that you can edit in the directory .husky/pre-commit - Configure Git hooks path
The default file is above, We will modify this file to run the commands that we want to run as a part of a pre-commit. Before we just add the long commands that were listed in this article, we should go ahead and create some scripts in our package.json file to make things simpler. In the scripts section let's add a scripts for the following. This will allow us to run npm run lint and have all our files linted.
// package.json

....
  "scripts": {
    "ui": "npx playwright test --ui",
    "lint": "eslint .",
    "lint:fix": "eslint . --fix",
    "prettier": "prettier . --check",
    "prettier:fix": "prettier . --write",
    "prepare": "husky install"
  },
 ....
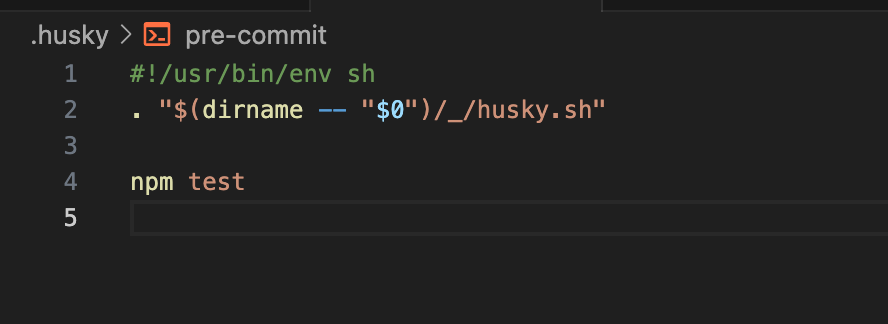
Let's go back to our .husky/pre-commit file and modify the file to include 2 of the scripts we just created.
// .husky/pre-commit

#!/usr/bin/env sh
. "$(dirname -- "$0")/_/husky.sh"

npm run lint && npm run prettier
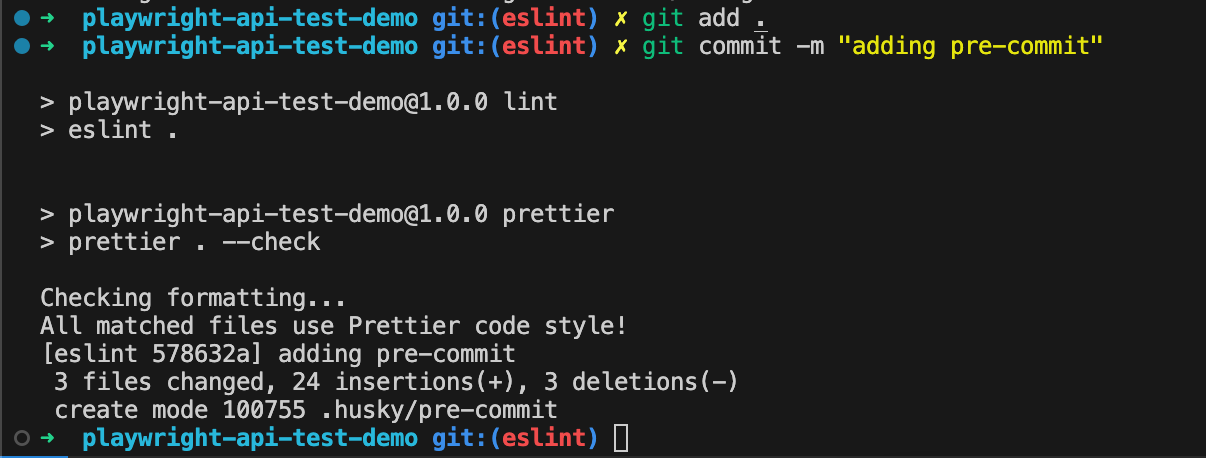
Now we should be able to add our files, and attempt to commit our code and our commands should run by default. Below is an example of the checks running and everything passing with no issue, which allowed the commit to be created.
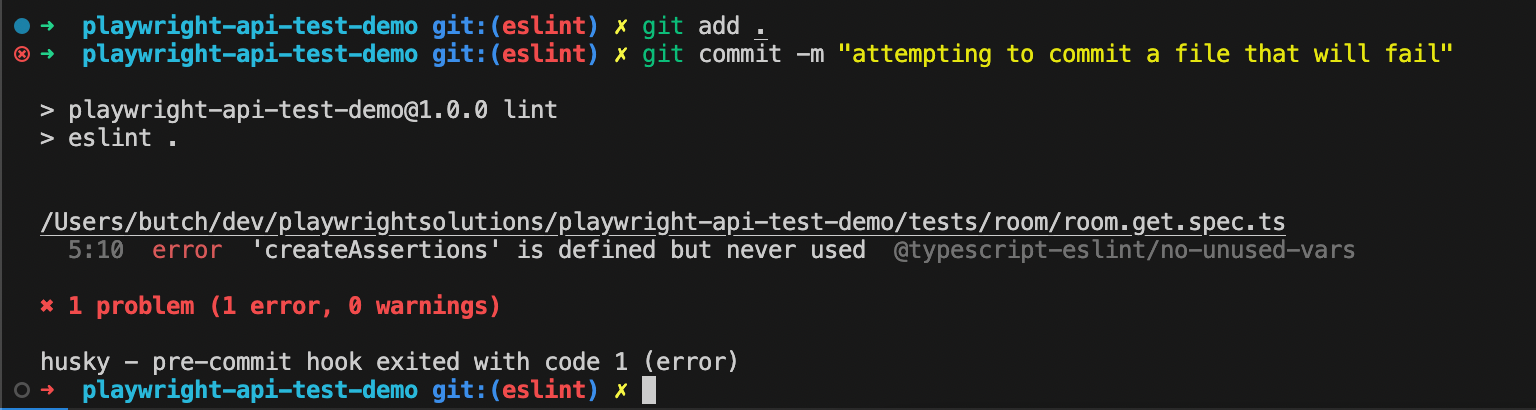
Sometimes though you will try and commit code that will fail the linter, this is what the error will look like, when this happens. This will block your commit from committing, and force you to fix the issue before proceeding. The nice thing is we just created a command that should fix the lint issues if is automatically fixable npm run lint:fix.
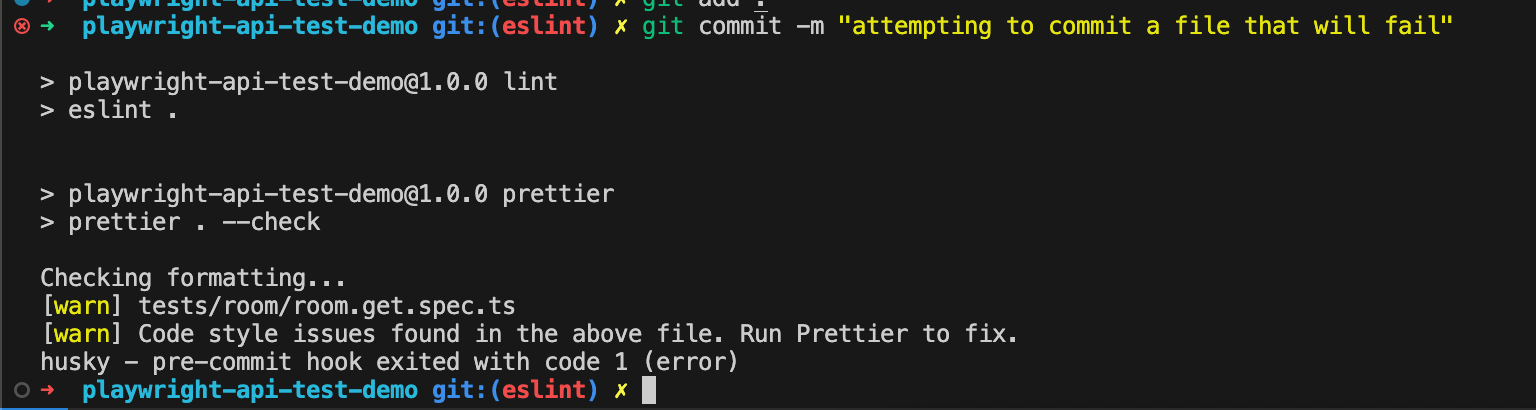
Similarly when you attempt to commit code that doesn't meet the prettier formatting, you will receive an error that matches the below, and your commit will not be committed. You must update the file(s) in question with the correct formatting, this can be achieved by npm run prettier:fix to run the custom script we created.
If you ever run into a situation where you want to break the rules and force a commit, you can add a --no-verify option to the end of your git commit message. Ex: git commit -m "forcing the commit" --no-verify. This is not something that should be done often if even at all, but this will allow you to bypass the checks if needed. If you force the commit more than likely other folks that work in your repo will be faced with the same error when they pull down the changes that caused the error. USE WISELY....
Update your Readme
One thing that irks me when working in a new repo is not having all the information I need to get started in some sort of documentation. Below is an example of what I've added to my readme, so everyone can get up to speed in contributing with pre-commit hooks after cloning the repo down.
// README.md

...
## Contributing to playwright-api-test-demo

### Husky, ESLint, and Prettier

We use a mix of [Husky](https://github.com/typicode/husky), [ESLint](https://eslint.org/) and [Prettier](https://prettier.io/) within our repository to help enforce consistent coding practices. Husky is a tool that will install a pre-commit hook to run the linter any time before you attempt to make a commit. This replaces the old pre-commit hook that was used before. to install the pre-commit hook you will need to run

```bash
npm run prepare
npx husky install
You shouldn't have to run this command but for reference, the command used to generate the pre-commit file was
npx husky add .husky/pre-commit "npm run lint && npm run prettier"
You are still able to bypass the commit hook by passing in --no-verify to your git commit message if needed.
ESLint is a popular javascript/typescript linting tool. The configuration for ESLint can be found in .eslintrc.cjs file. Prettier, helps with styling (spaces, tabs, quotes, etc), config found in .prettierrc.
...
Extending ESLint to account for custom errors
One of my big problems that I used to run into a lot before ESLint was introduced into my life, was accidentally committing .only into my test files. I would use this syntax test.only() to execute/debug a single test quickly from the command line. When the .only would get committed it would only run that 1 test as a part of our CI and cause a lot of back and forth. To solve this I created a custom error rule and added it to my eslintrc.cjs. See the rules section specifically no-restricted-syntax. I set the message as error, and followed the docs to create a matcher that would flag this issue and block commits with a custom message.
// eslintrc.cjs

/* eslint-env node */
module.exports = {
  extends: [
    "eslint:recommended",
    "plugin:@typescript-eslint/recommended",
    "plugin:@typescript-eslint/stylistic",
    "prettier",
  ],
  parser: "@typescript-eslint/parser",
  plugins: ["@typescript-eslint"],
  root: true,
  "rules": {
    "no-console": 0,
    "no-restricted-syntax": [
      "error",
      {
        "selector": "CallExpression[callee.property.name='only']",
        "message": "We don't want to leave .only on our tests😱"
      },

    ],
  },
};

The sky is the limit on what you can do with this knowledge!
Other Resources
I personally don't use the eslint-plugin-playwright but it can easily be added to the ESLint configuration and setup you just created for your repo. Start by Installing npm install -D eslint-plugin-playwright and updating .eslintrc.cjs to include "plugin:playwright/recommended" in the extends array you can have access to some specific Playwright rules.


VS Code Extensions
These VS code extensions are helpful as they will give you feedback
VS Code Settings file
The last recommendation that I enjoy enabling for my repos is the auto format/auto save. Below is my setting file which also includes some eslint settings as well that I found here.
// .vscode/settings.json

{
  "eslint.validate": ["javascript", "typescript"],
  "editor.codeActionsOnSave": {
    "source.fixAll.eslint": true
  },
  "editor.formatOnSave": true,
  "editor.defaultFormatter": "esbenp.prettier-vscode",
}
You should be all set and good to go with all the changes, you now can have consistency within your files, and an extra set of checks that will help guard you from pushing bad code to your repository!
All the code I added is available in this repo.
 playwrightsolutions
Thanks for reading! If you found this helpful, reach out and let me know on LinkedIn or consider buying me a cup of coffee. If you want more content delivered to you in your inbox subscribe below, and be sure to leave a ❤️ to show some love.