The Definitive Guide to API Test Automation With Playwright: Part 12 - My Top 10 Great Practices

Ok so I will admit, I was tempted to title thisBest Practices but decided to stick with Great practices because all the advice I plan to give really "Depends on Your Context". I do however plan to give you some good advice along with rationale so you can tell when it becomes bad advice. I believe, if you don't understanding why something should be done, then you've fallen into a trap of building things that aren't helping you reach your goals, and you'll keep doing it even when it's no longer necessary or even becomes deleterious.
If you're just joining us now go check out the introduction post which links to all parts we've covered so far. For our examples we will use the playwright-api-test-demo repository linked below.
 playwrightsolutions
Great Practices
Reminding you of our context, we have been on a 11 Part journey where we have built a somewhat complex API Test Automation Regression Suite of checks against the API that drives https://automationintesting.online/.
1. Establish a Goal for Your Playwright Test Suite
Decide on what your goal will be for this automation suite. For example my goal with the the repo we've been building has been to catch Regression bugs, acting as a change detection tool. If the API changes in a breaking fashion (things about the api responses are changed or removed) the automation should catch this. In it's current state it wouldn't catch new non-breaking changes that are added to the APIs, for example a new peice of information on the response body. Once you have this goal go ahead and add it to your readme.md and share it with your team.
2. Write Independent Tests
- Each test should be able to run on it's own in any order.
- There should be no dependencies that are needed between tests (outside of a
setupscript that runs before the test suite). - Tests shouldn't share data between themselves
If you build your tests this way you unlock the power of running multiples tests at once, and eventually sharing your tests for SPEED!

3. Naming Your Test Files Well
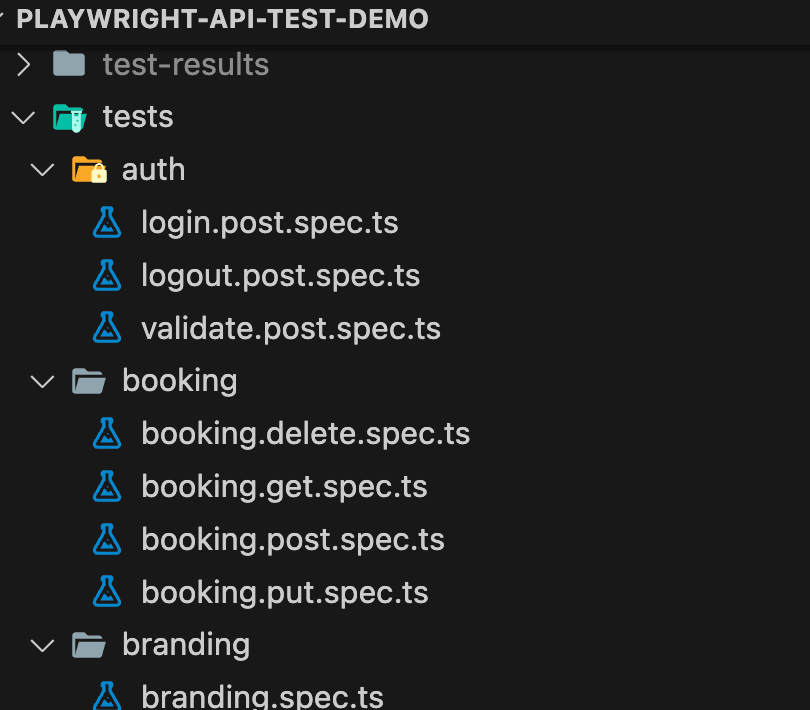
When creating your tests, it's always helpful to organize them in a way that is logical and easy to follow. As you can see below, each test is organized in it's own folder auth for example are all the end points that are at the path https://automationintesting.online/auth/ with the following name the actual endpoint that is being hit, along with the verb in the test name. This makes it really easy to see which tests exist, and a great pattern to follow. If you decide to follow a different pattern, that is fine just find something that you can manage and do it consistently!
4. Utilize Describe and Test Titles Well
In the below example I have taken the login.post.spec.ts file and removed most of the logic keeping the titles. When the below test runs, the describe block is at the highest level, and when tests run will be the overall container for all of the other tests when it comes to reporting. You can notice that in the describe block I put the full endpoint path, along with the Verb. And within each test title I start with the POST verb along with what the test is actually checking (either positive or negative). This will help give a pattern, and make it really easy to troubleshoot when failures occur, our you have multiple VERB types within the same describe block (this can be seen in other tests within the repository we are working from).
// ./tests/auth/login.post.spec.ts

//COVERAGE_TAG: POST /auth/login

import { test, expect } from "@playwright/test";
import { isValidDate } from "@helpers/date";
import Env from "@helpers/env";

test.describe("auth/login POST requests", async () => {
  ...
  test("POST with valid credentials", async ({ request }) => {
    ...
  });

  test("POST with invalid username and password", async ({ request }) => {
    ...
  });

  test("POST with valid username and invalid password", async ({ request }) => {
    ...
  });

  test("POST with invalid username and valid password", async ({ request }) => {
    ...
  });

  test("POST with no username and valid password", async ({ request }) => {
    ...
  });

  test("POST with empty body", async ({ request }) => {
    ...
  });

  test("POST with no body", async ({ request }) => {
    ...
  });

  test("POST with valid credentials then validate with token", async ({ request }) => {
    ...
  });
});
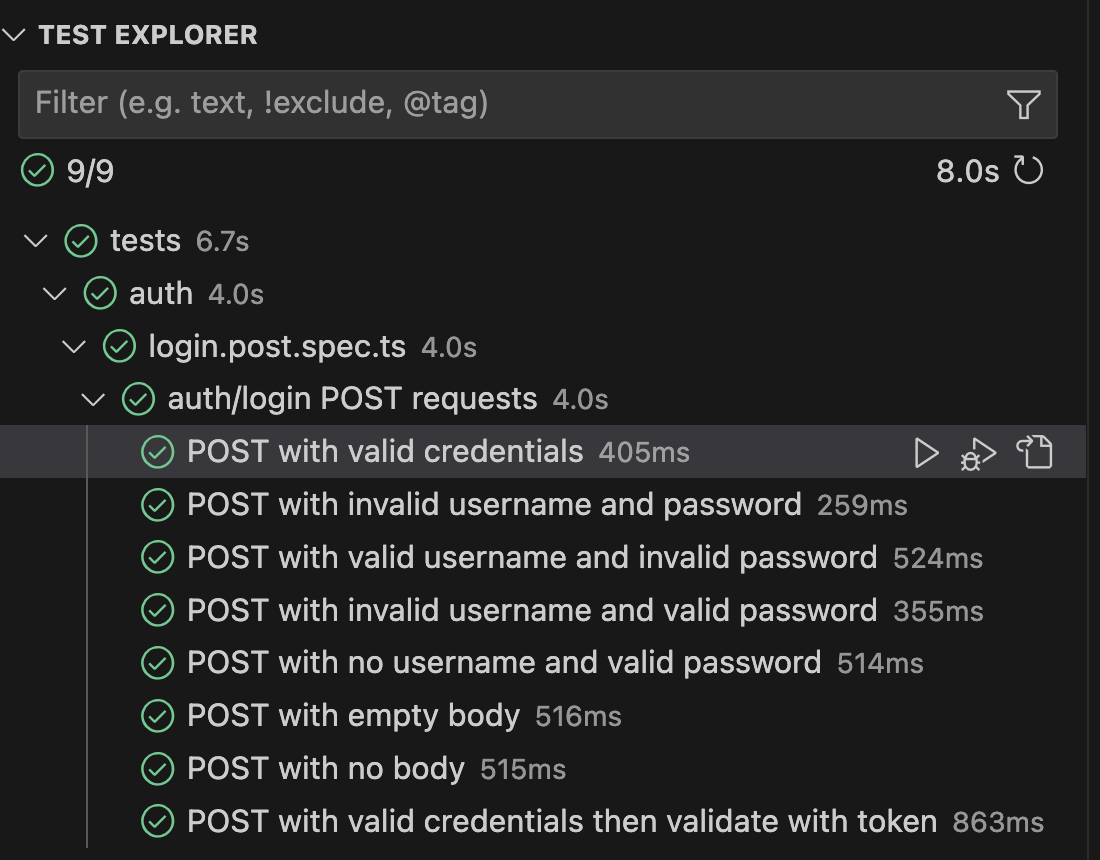
As you can see there is a nice tree, and I can easily see the tests, which tests that were run, and the information about each tests just from the title. Following this pattern also allows me to collapse each endpoint down in the VS Code Test Explorer.
5. Utilizing let Variables in Describe Blocks
For these next few practices we will use the following bookings.post.spec.ts code example. In this test I am making a POST to the booking/ URL. In order to make this post I need a valid roomId, checkInTime, and checkOutTime. When I need specific data like this especially if I want to have multiple tests, I want to be able to create some data in a beforeEach() block of code. When I do this if I create a variable within the beforeEach(), such as the const room = line of code, because of the way Javascript scoping works, I am not able to use that variable outside of the beforeEach() block. So anytime I need a variable that I want to set in a beforeEach() and then use it in my test later (see requestBody and roomId) I create empty let variables at the highest level within the describe() block.
// ./tests/booking/bookings.post.spec.ts

//COVERAGE_TAG: POST /booking/

import { test, expect } from "@playwright/test";
import { createRandomBookingBody, futureOpenCheckinDate } from "@datafactory/booking";
import { stringDateByDays } from "@helpers/date";
import { createRoom } from "@datafactory/room";
import { validateJsonSchema } from "@helpers/validateJsonSchema";
import { validateAgainstSchema } from "@helpers/validateAgainstSchema";

test.describe("booking/ POST requests", async () => {
  let requestBody;
  let roomId;

  test.beforeEach(async () => {
    const room = await createRoom();
    roomId = room.roomid;

    const futureCheckinDate = await futureOpenCheckinDate(roomId);
    const checkInString = futureCheckinDate.toISOString().split("T")[0];
    const checkOutString = stringDateByDays(futureCheckinDate, 2);

    requestBody = await createRandomBookingBody(roomId, checkInString, checkOutString);
  });

  test("POST new booking with full body", async ({ request }) => {
    const response = await request.post("booking/", {
      data: requestBody,
    });

    expect(response.status()).toBe(201);

    const body = await response.json();
    expect(body.bookingid).toBeGreaterThan(1);

    const booking = body.booking;
    expect(booking.bookingid).toBe(body.bookingid);
    expect(booking.roomid).toBe(requestBody.roomid);
    expect(booking.firstname).toBe(requestBody.firstname);
    expect(booking.lastname).toBe(requestBody.lastname);
    expect(booking.depositpaid).toBe(requestBody.depositpaid);

    const bookingdates = booking.bookingdates;
    expect(bookingdates.checkin).toBe(requestBody.bookingdates.checkin);
    expect(bookingdates.checkout).toBe(requestBody.bookingdates.checkout);

    await validateJsonSchema("POST_booking", "booking", body);
    await validateAgainstSchema(booking, "Booking", "booking", ["email", "phone"]);
    await validateAgainstSchema(booking.bookingdates, "BookingDates", "booking");
  });
});
6. Utilizing beforeEach() for Test Data Creation
Looking back to the example above you can see a lot is happening in the beforeEach() section of the code. My goal of the test here is to do any data creation or manipulation that we need for the test to run in the beforeEach() block. In this case it meant:
- Creating a room
- Setting the roomId variable
- Getting an available future checkin data with the datafactory
- Creating a valid checkin string
- Creating a valid checkout string 2 days from a helper function
- Creating a requestBody object utilizing the datafactory
If this endpoint required authentication I would have also created the appropriate authorization headers in the beforeEach()
Doing all of this makes the test very basic, all I had to do was make the POST request with the requestBody that was set, and then start making assertions!
Data Factory comes in handy to keep our code DRY )7. When Making Assertions Always Start with Status Code
From the above example still you can see the first assertion that we make is an expect on the response status code. I've found having this check first will save yourself a lot of headache.
...
    expect(response.status()).toBe(201);

    const body = await response.json();
    expect(body.bookingid).toBeGreaterThan(1);

    const booking = body.booking;
    expect(booking.bookingid).toBe(body.bookingid);
    expect(booking.roomid).toBe(requestBody.roomid);
...
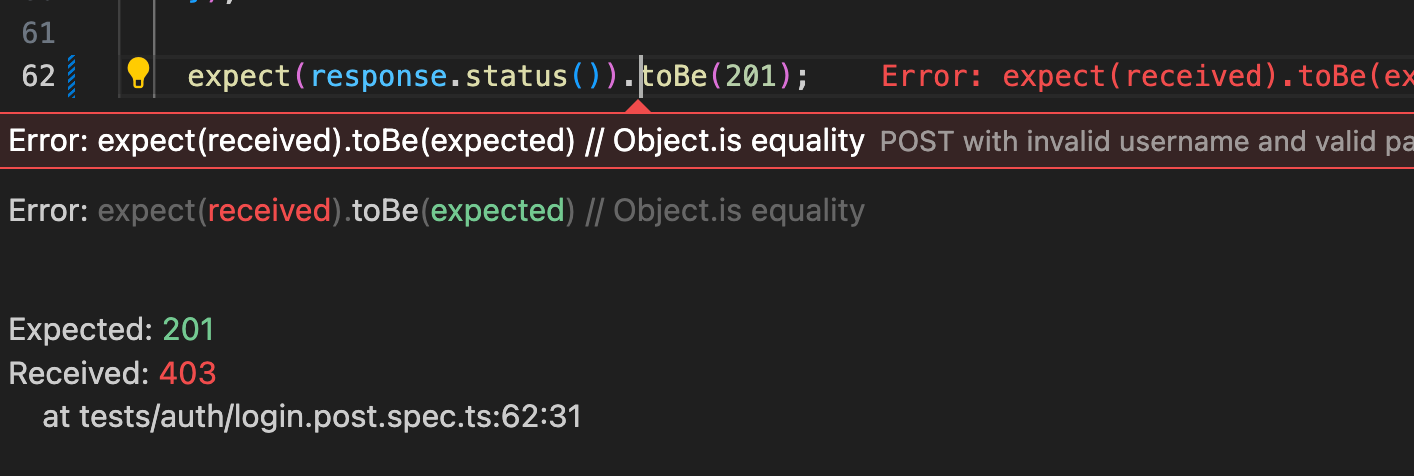
When I first began writing API automation with playwright I typically would have this after setting the const body = await response.json(); line of code, that were in most of my tests. The issue is sometimes a test would fail with an error like this. SyntaxError: Unexpected end of JSON input. I thought well, is my test broken, or is it the system I am checking broken. I didn't have a clear indicator what the problem was from this error message.

The reason this error happened in this case was the response body was not in JSON format, it was returned as TEXT from the endpoint because the response code was not 201 it was 403. Adjusting these two lines back around, now the test fails with a really useful error message.
8. Have a Test Data Strategy
I do believe the hardest part of Test Automation is creating a strategy with your test data. I discuss this in-depth on Part 6, it's worth checking out if you haven't already.

There are of course other strategies you could employ such as seeding the data through setup scripts, reseting the database to get data to a good state, or creating static data that will always be available. Each situation may require a different solution but what's important you need have "A Strategy" in place and make sure it's communicated far and wide for anyone contributing to the automation or using the environments the automation runs against.
9. Utilize afterEach() When Logging Out
If you have any kind of tests that utilize a saved cookie or logged in state, you need to make sure that if you have a logout test that destroy's the session your automation is using, that you utilize the afterEach() block of the test to re-create a newly authenticated state. I don't have an example of this within this codebase because I create new authentication any time I need authorization.
You can also utilzie afterEach() to clean up any data that other tests my rely on. This can be seen in the test below, specifically on the PUT test. you can see that after I change the branding, I run checks on the response body, and right after the assertions, another PUT request with the original body is made to update the data.
// ./tests/branding/branding.spec.ts

//COVERAGE_TAG: GET /branding/
//COVERAGE_TAG: PUT /branding/

import { test, expect } from "@playwright/test";
import { defaultBranding, updatedBranding } from "@helpers/branding";
import { createHeaders } from "@helpers/createHeaders";
import { validateJsonSchema } from "@helpers/validateJsonSchema";
import { validateAgainstSchema } from "@helpers/validateAgainstSchema";

test.describe("branding/ GET requests", async () => {
  const defaultBody = defaultBranding;

  test("GET website branding", async ({ request }) => {
    const response = await request.get("branding");

    expect(response.status()).toBe(200);
    const body = await response.json();
    expect(body).toEqual(defaultBody);

    await validateJsonSchema("GET_branding", "branding", body);
    await validateAgainstSchema(body, "Branding", "branding");
    await validateAgainstSchema(body.contact, "Contact", "branding");
    await validateAgainstSchema(body.map, "Map", "branding");
  });
});

// This test has the potential to cause other UI tests to fail as this branding endpoint is a critical part of the entire UI of the website
test.describe("branding/ PUT requests", async () => {
  const defaultBody = defaultBranding;
  const updatedBody = updatedBranding;
  let headers;

  test.beforeAll(async () => {
    headers = await createHeaders();
  });

  test.afterEach(async ({ request }) => {
    await request.put("branding/", {
      headers: headers,
      data: defaultBody,
    });
  });

  test("PUT website branding", async ({ request }) => {
    const response = await request.put("branding/", {
      headers: headers,
      data: updatedBody,
    });

    expect(response.status()).toBe(202);
    const body = await response.json();
    expect(body).toEqual(updatedBody);

    await validateJsonSchema("PUT_branding", "branding", body);
    await validateAgainstSchema(body, "Branding", "branding");
  });
});
10. Things to Test For When Writing API Checks
- Review the API documentation when writing automation. Check for all the different types of parameters that can be sent, and what parameters should be returned.
- You should have shoot for at least 3 test cases where you can send: All Parameters, Required Parameters, and No Parameters, if there inputs on the endpoint.
- Test for negative scenarios. This may sound crazy but the moment, an unauthorized API call returns a
200rather than a403your security team and developer team will be thankful. - Another negative scenario could be attempting to send a number instead of a string to the API and check the response. It should be a clear error message for the end user, that you can assert on.
- Create a
test/scenariosfolder under if there are multiple API calls that need to be made in sequence. These examples are typically tests that need chcecks across mutliple API endpoints such as: email notifications, apikey creation and validation (create an api key > then attempt to log in with it), permission endpoints that require steps to not just validate the permission was created, but that the permission rules are followed.
I'm sure there are few great practices that I missed but for now this should get you to a great starting point!

Thanks for reading! If you found this helpful, reach out and let me know on LinkedIn or consider buying me a cup of coffee. If you want more content delivered to you in your inbox subscribe below, and be sure to leave a ❤️ to show some love.